What this class covered
- Pulling the issue key out of a chat, with Edit Fields and a regex
- The triage comment workflow, rebuilt from scratch
- Debugging the comment: not a valid JSON body
- Many keys at once, with the n8n Assistant
- Triage on every new issue: the Jira trigger, and schedules
- The RCA agent: what it needs, set as homework
- What a flaky test is
- The flaky test finder: two builds, a form and Slack
- The exports in the repo
- The capstone: one pipeline
- Tasks and announcements
- Edit Fields with a regex pulls the issue key out of a chat: the class's pattern returns the first key, in upper case, and nothing for VWO 48.
- Ask the model for JSON with fixed keys, because JSON is easy to parse; parseJson() then gives you each field.
- A value pasted into a JSON body breaks it if it holds a line break or a quote: ask for plain text, or escape it with JSON.stringify.
- A Jira trigger on issue created runs the triage for every new ticket by itself; the chat is only for debugging.
- An RCA says what happened, how it happened and the fix; the how needs recent commits and app logs.
- A flaky test fails in one run and passes in another; a test that fails every time is a real failure.
- Understand the base first; then let the AI extend it, and review what it builds.
Pulling the issue key out of a chat message
The last class built a bug triage agent, and it was working fine, the instructor recalled. This class went further, starting with a question: say someone types please create a test plan for VWO-48. How do you parse that, so that another node gets only VWO-48? To get a Jira ticket, you have to pass an issue key, the instructor said, and if you drag the whole chat output into the Jira node, it will not work: it needs a key, not your full message.
Edit Fields and a regex. For this there is Edit Fields: the chat's data arrives in it, and there you write a custom regex, a regular expression, which basically means a pattern. The instructor had already created one: from the chat input, make it upper case, match the part with a hyphen in it, and take element zero. Execute the step and it returns the key; drag that key into the Jira node, and it fetches the ticket. The same way, you can find the project key, VWO, too. In the class's export, the field is issueKey:
              "name": "issueKey",
              "value": "={{ ($json.chatInput.toUpperCase().match(/[A-Z][A-Z0-9]+-\\d+/) || [''])[0] }}",
              "type": "string"
The JSON file escapes the backslash, so in n8n the pattern reads [A-Z][A-Z0-9]+-\d+: a capital letter, then one or more capitals or digits, a hyphen, and one or more digits. When nothing matches, || [''] makes the answer an empty string.
Where a pattern comes from. The instructor showed regex.ai, where you insert your text and drag the cursor to highlight the parts you want; in class it did not give a pattern. ChatGPT did: give me the regex pattern to find only VWO-48, and make it generic in nature, because it can be VWO-48, it can be BUG-1234, or a key from another project. The class's expression, run locally on messages like the ones typed in class:
| Message typed | issueKey |
|---|---|
| please create a test plan for VWO-48 | VWO-48 |
| triage this bug vwo-48 | VWO-48 |
| fetch VWO 48 | an empty string |
| fetch REST-1 | REST-1 |
| Triage all these bugs and add comments: VWO-48, VWO-49, VWO-50 | VWO-48 |
| BUG-1234 | BUG-1234 |
VWO 48 with a space is not a Jira pattern, the instructor said, so it fails: the expression returns an empty string, and the Jira node has no key to fetch. All Jira tickets follow a similar pattern, whatever the project: the class tried REST-1 from another project. The first try did not fetch it: give the Jira node only the issue key field, not the whole input, the instructor said, and it will fetch the details. And a message with three keys gives only the first, which is why the bulk version below needed more than this regex.
The question and the key, separately. Then the class tried the idea on the last class's agent: the same Edit Fields node in front of it, and the agent's prompt defined below in two parts, here is the question from the user, and my issue key is. Now the agent knows two things separately, the instructor said: what the user has asked, and the issue key. A learner asked whether the agent could use its brain to find the key instead: that also can be done, the instructor said.
How do I parse this, so that I can give only the key to another tool?
Worth practising too: What does the class's expression return for fetch VWO 48, and for a message with three keys in it?
Show the answer
Answer. With Edit Fields and a regex: upper-case the chat input, match the key's pattern, and take element zero, then give only that issueKey field to the Jira node, not the whole message. For fetch VWO 48 it returns an empty string, because a key with a space is not a Jira pattern; for three keys, only the first, VWO-48.
The triage comment workflow, rebuilt from scratch
The first try. On the old agent, the instructor first wired in the comment request from the last class, with the parsed key in its URL, and the run said the issue does not exist. A new HTTP request, imported from a curl that ChatGPT wrote for the Jira config, came with a Basic auth token built in, and that run said method not allowed. A multi-agent system would make more sense, the instructor said, but a lot of people had confusion, so the workflow was built again from scratch, fresh, step by step.
The objective, as the sticky note in the export puts it: fetch the Jira ticket, read it and triage comments, and update the Jira ticket with the triage comments. The flow: a chat; an Edit Fields node for the issue key; a Jira node that fetches the ticket itself, rather than as the agent's tool; the AI Agent, which writes the comments; another Edit Fields node to get the triage comments; and an HTTP request that updates Jira. The agent is not using any tool as of now, the instructor said, though it could be made an agent with tools too. The README calls this a fixed pipeline: the wiring, not the model, decides each step, and a comment adds to the ticket instead of rewriting it, so the last class's risk of losing the description is gone.
What the agent needs. From Jira: a title and a description, with the issue key. Based on these three, give me the response in JSON: severity, priority, and comments or gaps. You can use the RICE-POT method here too, the instructor said, but this agent has only one responsibility: it takes your key, title and description, and gives you the response as it is. Where is the title? A learner found it: in Jira's response, it is the summary. The prompt, defined below, and the system message, as exported (decoded from the JSON strings on lines 78 and 80):
Issue Key : {{ $json.key }}

Title : {{ $json.fields.summary }}

Description  : {{ $json.fields.description }}
based on the Issue Key, Title and Description give me the

Response as json with keys

{
  "severity" : "",
  "priority" : "",
  "comments" : ""
}

in the comments add the gaps you think,

Make sure the comments are simple, don't add anything like /n and more, normal text string without special chars
Why JSON? Because the JSON format is easy to parse, the instructor said. The first answer came back with the issue key, title, description, environment and steps to reproduce, and no triage, so the instructor asked for only this JSON, with the keys severity, priority and comments, and the gaps in the comments. Then it worked: severity, priority and proper comments. You can pin the data if you do not want to make the request again and again, the instructor added.
Taking the comments out. The next node parses the agent's output and gets the comments. You can get the severity and priority too, if you want; the priority, as of now, the instructor did not want. In the export:
            {
              "id": "7fbb1167-07bd-40f4-929e-86cdf765d38d",
              "name": "IssueKey",
              "value": "={{ $('Edit Fields').item.json.issueKey }}",
              "type": "string"
            },
            {
              "id": "94a513ab-6e19-49fb-925b-06e486905223",
              "name": "Comments",
              "value": "={{ $json.output.parseJson().comments }}",
              "type": "string"
            },
            {
              "id": "194ad319-b6a5-45df-ace3-1a16ff1dd828",
              "name": "Severity",
              "value": "={{ $json.output.parseJson().severity }}",
              "type": "string"
            }
n8n's docs say parseJson() returns the object the string represents, or undefined if the string is not valid JSON, and the README names one way that happens: the model wrapping its answer in a code fence. Severity is taken too, but nothing writes it to Jira.
The update. The URL takes the issue key, and if you hover over it, you see the full URL. For authentication, the instructor used the Jira authentication, the saved credential, instead of a header; the text value is the comment, dragged in. In the export, with the Jira site masked here:
        "method": "POST",
        "url": "=https://<your-site>.atlassian.net/rest/api/3/issue/{{ $json.IssueKey }}/comment",
        "authentication": "predefinedCredentialType",
        "nodeCredentialType": "jiraSoftwareCloudApi",
        "sendBody": true,
        "specifyBody": "json",
With the predefined credential type, n8n authenticates the request with the saved Jira credential, so the export holds no token and no hard-coded auth header. The endpoint is Jira's Add comment, which adds a comment to an issue: if comments are already there, it will keep appending, the instructor said. The body is Atlassian Document Format, the JSON object in which Jira Cloud stores comment text. Decoded from line 100, with the comment pasted in as text:
{
  "body": {
    "type": "doc",
    "version": 1,
    "content": [
      {
        "type": "paragraph",
        "content": [
          {
            "type": "text",
            "text": "{{ $json.Comments }}"
          }
        ]
      }
    ]
  }
}
Why have I asked for the response in JSON format?
Show the answer
Answer. Because JSON is easy to parse: the next node uses parseJson() to take the comments, and the severity if you want it, out of the agent's answer, and passes them on.
Instead of an HTTP request, can't we make an update request?
Show the answer
Answer. Adding comments works only through a separate HTTP request, the instructor answered: directly, it does not work. The last class's notes also point to another route, in n8n's docs: the Jira node's Issue Comment resource.
Debugging the comment: not a valid JSON body
The first run of the update stopped with an error the instructor read out: JSON body is not a valid JSON. Do you know what the problem is? The comments this agent gives have a lot of slash n and so on, the instructor explained, and if you have a special character, our JSON will break. So the system message says it clearly: make sure the comments are simple, don't add anything like slash n, a normal text string without special characters. (The prompt writes /n; the character meant is the line break, \n.) The model still added brackets, which was fine. With one slip in the prompt fixed (it had said with special characters, for without), the next run put the triage comment on the Jira ticket.
So the AI has done the triaging automatically: it reads your Jira ticket and comments on it, and you do not have to comment yourself. You can make it better, the instructor said: ask the agent to update the priority and severity as well. What did we learn? How to parse details from one node to another, dynamically.
Why a line break breaks it. The body is JSON text with the comment pasted inside its quotes, and parseJson() has already turned each \n in the agent's answer into a real line break, which a JSON string may not hold; a double quote ends the string early. A local check, outside n8n: the export's body template, with four sample answers taken through the same steps, then parsed as JSON:
| Comments in the sample answer | The pushed body | The README's safer body |
|---|---|---|
| A plain sentence | parses | parses |
Line breaks, written \n in the answer |
not valid JSON | parses |
| A word in double quotes | not valid JSON | parses |
| Details in brackets | parses | parses |
The README says the same, and gives a safer value: "text": {{ JSON.stringify($json.Comments) }}, with no quotes around it, escapes quotes and line breaks for you. In the check above it parsed every time, and the text came back unchanged.
JSON body is not a valid JSON. Do you know what the problem is?
Show the answer
Answer. The comments had line breaks, the slash n, and special characters, and the comment is pasted into the JSON body as it is. The class's fix was in the prompt: a normal text string without special characters. The README's safer fix escapes the value with JSON.stringify, so a quote or a line break cannot break the body.
Many keys at once: the n8n Assistant
How do you run this for multiple Jira IDs? The instructor duplicated the workflow as a bulk version. n8n has a loop option for this, a looping mechanism, but the instructor showed it through AI. Why? Because now you understood the base, the instructor said: when you understand the base, you can use the AI, and when you do not, it will be difficult for you to learn.
The tool is the Assistant button, the n8n Assistant, which n8n's docs describe as a way to create, edit, test and troubleshoot workflows from a chat. The request: modify this for multiple bug IDs, with input such as triage all these bugs and add comments, VWO-48, VWO-49, VWO-50. Its plan was to extract all the ticket IDs and split them into keys, so that each one runs, and it modified the existing workflow in front of the class. The bulk version takes all the IDs, splits them, and runs once per key: three times, for three keys, the instructor said. The other way: export the workflow as JSON, give it to ChatGPT with the same command, and take the final JSON it gives back. Either way, n8n's docs add, review generated workflows before using them in production. The bulk copy was shown in class; it is not in the repo.
If you want to run this for multiple Jira IDs, how can we do that?
Show the answer
Answer. With a loop, or, as the class did, by asking the n8n Assistant to change a copy of the workflow: extract every key from the message, split them, and run the triage once per key. You can also export the JSON, ask ChatGPT to modify it, and import the result. Review what the AI builds either way.
Triage on every new issue: the Jira trigger
How many of you want it to run by itself? n8n has a Jira trigger with On issue created: whenever an issue is created, the trigger starts automatically, and the same flow can follow. The instructor created a test bug in Jira, and the trigger picked it up automatically. The chat becomes optional: it is only for debugging.
Published, then fixed. Publish means the workflow is now running. The next new bug did not run properly, and the problem was the key: the Get issue step read it from the chat input, and now there is no chat. The key comes directly in the trigger's response: just pick it up, the instructor said, and the README notes that the regex step is gone. The instructor made a new copy, Jira Schedule, so as not to hamper the previous one, cloned an issue to test it, ran the nodes one by one, removed some extra spaces, and published again. A new bug, and the comment was added by itself: your job is 100% automated, the instructor said. In the export, the trigger and the key:
      "parameters": {
        "events": [
          "jira:issue_created"
        ],
        "additionalFields": {}
      },
      "type": "n8n-nodes-base.jiraTrigger",
              "name": "issueKey",
              "value": "={{ $json.issue.key }}",
              "type": "string"
For your company, change a few details: use a proper prompt, your project details, and an output that fits your company. You can install n8n on your own computer and run it locally, 24/7, and it is 100% free when you run it locally, the instructor said. The README adds a condition for this trigger: Jira Cloud has to reach your n8n's webhook URL, and it warns that a localhost n8n will never fire. It also notes that the export has no filter, so it runs for every issue created, of any type, and that posting the comment does not start it again, because it listens only for issue created.
Conditions. You can add a condition, the instructor said: if the ticket is assigned to you, and it is a bug, run this and add the comments. JQL can say which tickets, for example everything assigned to you. A learner asked about tickets created by different QA members: you can do anything, the instructor said, such as a ticket created for one person, a bug created in the VWO project, or a comment someone added that you want to follow with another; there are unlimited scenarios you can automate. Another learner wanted a trigger for when someone in the team tags a Jira ID in a comment, to add a comment and tag a developer: yes, you can do that.
Schedules. Can we schedule the trigger? This trigger already runs by itself, so you do not have to, the instructor said; if you want, a schedule trigger can run it too, such as every 10 AM, with the flow changed to fetch the tickets. For a specific time, the instructor's answer was 12 PM, every 12 or every 24 hours, or a custom time written as a cron expression, which you can look up for 12 PM: it will then run every day at 12 PM, somewhere around this. Can we have multiple triggers? Of course, the instructor said.
n8n's Schedule Trigger docs write a cron expression as minute, hour, day of month, month and day of week, with an optional seconds field in front, and their table gives 0 12 * * 1 for noon every Monday. So every day at noon is 0 12 * * *, or 0 0 12 * * * with seconds: for both, a local check with the cron package gives 12:00:00 on three days in a row. The node uses the workflow's timezone if one is set, and the instance's if not, so check it before you count on 12 PM. One node can also hold several trigger rules, for different schedules.
Can we schedule the trigger also?
Show the answer
Answer. The Jira trigger already runs by itself on every new issue, so it needs no schedule. For a fixed time, use a schedule trigger with an interval or a cron expression: every day at noon is 0 12 * * * in the format n8n's docs give. And a workflow can have more than one trigger.
The RCA agent, a skeleton to finish
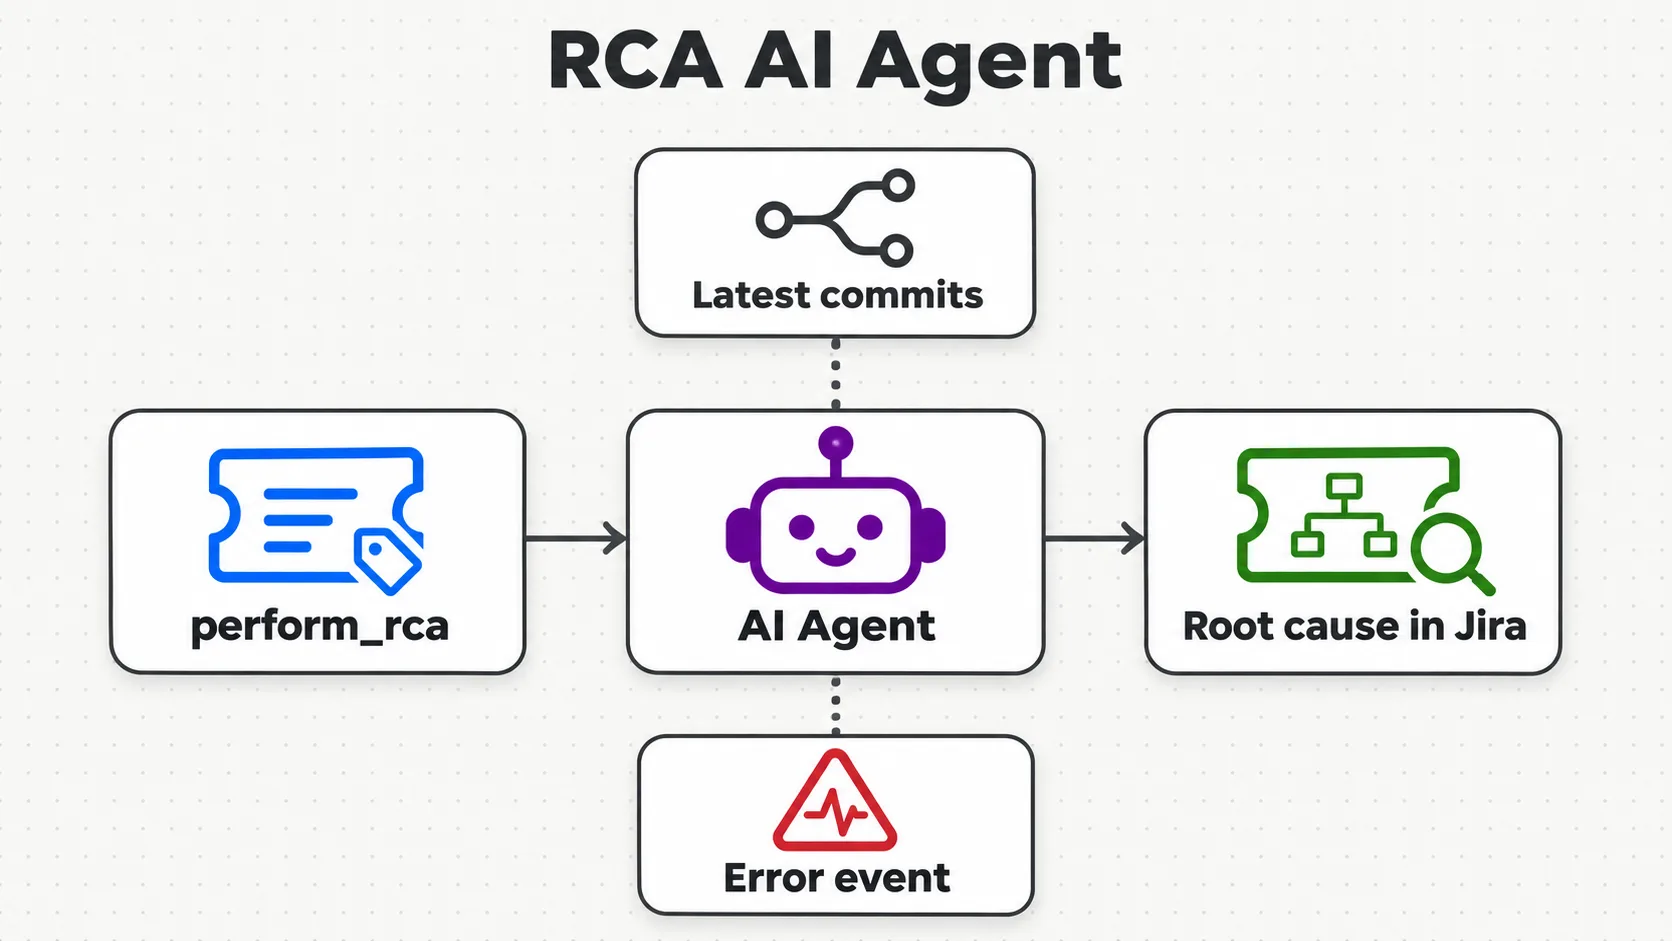
Can we do the same with RCA? Yes, the instructor said, and gave the RCA agent to everyone as a task. An RCA answers three things: what exactly happened, how it happened, and the fix. The real question is how, and for that you need the details of the git commits: to perform the RCA, get the recent commits of the developer repo, and the app logs if you have access to them, and based on that the agent gives you the cause.
Who does RCA? As QA, we sometimes do not have access to commits or logs, the instructor said, and then we just do it manually, which is what we do most of the time. There is an RCA done by developers, and an RCA done by QA people: if you have access to commits and app logs, you can do it too. Not everyone is going to do that, but it is possible.
The trigger. This is a hypothetical RCA AI agent, the instructor said, and the concept remains the same: a chat, or a Jira trigger when an issue is created, filtered so that it starts only for issues with a label. This is the real life the instructor was talking about: someone adds a label saying we need to do an RCA for this, perform RCA. The export writes the label perform_rca, and the filter is JQL, so the check happens in Jira before n8n is called, as the README notes:
      "parameters": {
        "events": [
          "jira:issue_created"
        ],
        "additionalFields": {
          "filter": "labels=\"perform_rca\""
        }
      },
      "type": "n8n-nodes-base.jiraTrigger",
The tools. For commits, n8n already has GitHub as a tool, and a GitHub MCP too, the instructor said: connect GitHub, and you can get an issue, a pull request, a review or a repository. Just figure out the right tool you need; the name for it will be get latest commits (in the export, get lastest Commits). Where are the logs? Generally in Sentry, which most applications use, the instructor said; people also use New Relic, and a New Relic MCP is there, the instructor said, and Kibana or ELK, and if there is no node for one, such as Datadog, there is an API for it. In the end, the agent updates the Jira ticket with the root cause. It will be simpler, the instructor thought, if it adds only one thing, a comment.
The export is a skeleton, and the README lists what each node still needs:
| Node | In the export | Still needs, by the README |
|---|---|---|
| Jira Trigger | issue created, filter labels="perform_rca" |
nothing: ready |
| AI Agent | no system message; the default prompt | a prompt with the trigger's key, summary and description, and an RCA system message |
| get lastest Commits | GitHub tool defaults: empty owner and repository, no credential | a GitHub credential, owner, repository and a read operation |
| Get an event in Sentry.io | no parameters, no credential | a Sentry credential, organization, project and event ID |
| Update an issue | no issue key, no fields | the trigger's key, and a field for the RCA: a comment keeps the description safe |
| When chat message received | not connected | delete it, or connect it to test by hand |
The README warns about the GitHub tool's defaults: its empty labels and assignees belong to creating an issue, so as exported it would create an issue, not read commits. If your node version has no commits operation, it suggests an HTTP Request tool on GitHub's list commits endpoint. ChatGPT gave the class a curl for the latest commits too, and the instructor asked Meeti to add it, if possible.
Practise it. A learner asked how to find the production issue for an RCA: in your Jira there must be a JQL for it, the instructor said, or a production product where they are tracked. To practise, create a free account on GitHub and a free account on Sentry, and a dummy repository: fetch the latest commits, fetch the latest logs, and based on that, the RCA can be done. Give it a try, the instructor said: it is a little difficult, but the instructor was pretty much sure you will be able to do it, and when you do it by yourself, you understand more. In the next class, the instructor will show how it can be done properly with the commits, and, if possible, a dummy Sentry.
How can we find the production issue for the RCA?
Show the answer
Answer. Through your Jira: there must be a JQL, or a production product, where production issues are found. To practise without that access, the instructor suggested free GitHub and Sentry accounts and a dummy repository: fetch the latest commits and the latest logs, and do the RCA on them.
Flaky or failing: what a flaky test is
Then something different: a flaky test case finder, with an AI agent. Whenever you run your Playwright tests, you get a report.json file, the instructor said, which tells you how many tests ran, which passed and which failed. Say 100 tests: on the first run, 97 passed and 3 failed. On the rerun, 2 of those passed, and 1 failed again. How many are flaky? Two, the instructor answered: they failed the first time and passed the second. The one that failed again is an actual failure.
Playwright writes that JSON file when you choose its JSON reporter: its docs say the JSON reporter produces an object with all information about the test run, written to a file with --reporter=json and the PLAYWRIGHT_JSON_OUTPUT_NAME variable, or with outputFile in the config.
It is a real problem if you are working with automation, the instructor said: daily you send a report, 100 tests passed today, the next day some failures, and a line that two tests are flaky in nature. A learner called it a headache; absolutely, the instructor agreed. So the job: find the flaky tests automatically whenever there are builds, and present the report to your QA manager.
100 tests: 97 passed and 3 failed on the first run, and on the rerun 2 of them passed. How many test cases are flaky?
Show the answer
Answer. Two: they failed the first time and passed in the rerun. The third failed again, so it is a real failure, not a flaky one.
The flaky test finder in n8n
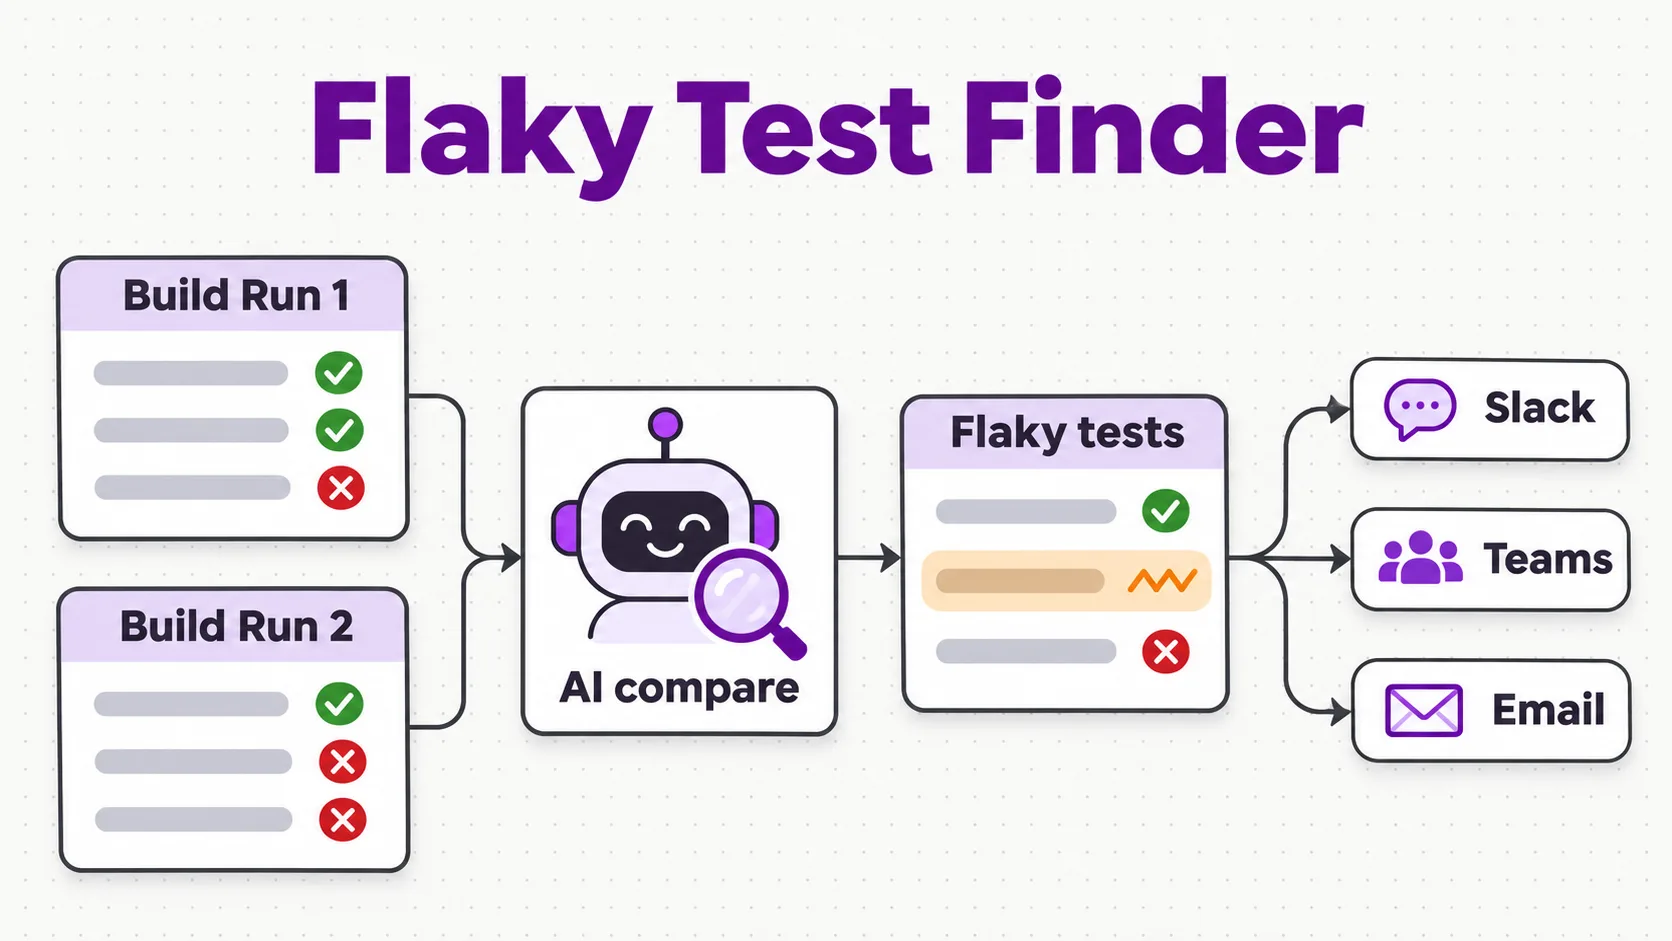
Where the results come from. Generally, Jenkins gives you the results: whenever Jenkins runs, an HTTP request can fetch the Jenkins console details by itself, and ChatGPT can give you the curl for it, the instructor said. For the class, a simpler way: a form that uploads two files, build number one and build number two. When you submit it, the AI agent runs and gives you the results to share with your QA manager. The form, as exported:
      "parameters": {
        "formTitle": "Flaky TestCase Finder",
        "formDescription": "Flaky TestCase Finder",
        "formFields": {
          "values": [
            {
              "fieldLabel": "Build Run 1",
              "fieldType": "file"
            },
            {
              "fieldLabel": "Build Run 2",
              "fieldType": "file"
            }
          ]
        },
        "options": {}
      },
Sample data, and files to text. For data, the instructor typed out a prompt for two Playwright-style JSON reports with dummy test names: five tests in build 1, three passing and two failing, and five in build 2, four passing and one failing, with one flaky; saved as report_build1.json and report_build2.json. On the first run the agent had no brain, so the class added the model, and then it said no prompt had been given. The files themselves were the next problem: you cannot attach files to the agent, so they need converting to text. The instructor reached for Extract from File and a Merge, then asked the AI for help: there are two files which the user will upload; merge them into a single text file. In the export, that step is one Code node, Merge Files into Text, which the README prints:
const item = $input.first();
const binary = item.binary || {};
const keys = Object.keys(binary).sort();
if (keys.length < 2) {
  throw new Error('Expected 2 uploaded files, got ' + keys.length + ': ' + keys.join(', '));
}
const parts = [];
for (const key of keys) {
  const buf = await this.helpers.getBinaryDataBuffer(0, key);
  parts.push({ key: key, fileName: binary[key].fileName || key, text: buf.toString('utf8') });
}
const merged = parts
  .map((p, i) => '===== Build Run ' + (i + 1) + ' (' + p.fileName + ') =====\n' + p.text)
  .join('\n\n');
const file = await this.helpers.prepareBinaryData(Buffer.from(merged, 'utf8'), 'merged_builds.txt', 'text/plain');
return [{
  json: {
    build_run_1_file: parts[0].fileName,
    build_run_2_file: parts[1].fileName,
    build_run_1: parts[0].text,
    build_run_2: parts[1].text,
    merged_text: merged
  },
  binary: { data: file }
}];
The README's copy matches the export's Code node character for character. Form uploads reach n8n as binary data and the agent reads only text, the README explains, so the node turns both files into the strings build_run_1 and build_run_2. Run locally, with stand-ins for n8n's helpers, on two small sample reports, it returned both texts and a merged_builds.txt file; given one file, it stopped with Expected 2 uploaded files, got 1, as the README says it should.
The prompt. The agent, Perform the Flaky Anaysis in the export, gets both runs in its prompt, and its system message says what to return. Decoded from the JSON strings on lines 67 and 69:
You will get two Build runs.

Build_Run_1 ({{ $json.build_run_1_file }}):
{{ $json.build_run_1 }}

Build_Run_2 ({{ $json.build_run_2_file }}):
{{ $json.build_run_2 }}
You will receive the two JSON files, which contain past test cases, build number 1 and build number 2. Your task is to give them the flaky test case as a result. That's it.

As a proper JSON file in this without the special chars

{
"total_tc" : ""
"flaky_tc" : []

}

give the list of title flaky testcases as json, reply without "\n"
The instructor asked for the list of flaky test titles, and then the total test count as well, as JSON, without the slash n; the model added escape characters where they were needed, which is fine. On the class's samples, the answer held one title, search for a product: in this case there was one, and with more you get an array.
The JSON example in that system message has no comma between its two keys, so it is not valid JSON as written: a local parse fails, and succeeds once the comma is added. Nothing in this workflow parses the reply, which goes out as text, and the README reminds you that the model does the counting, so check total_tc against the report.
Slack, Teams or email. Perform the flaky analysis and give me the report on Slack, the instructor said; if you want Teams, send it on Teams, and if you want email, add the email configuration. Posted to a channel, it did not show up; sent to one user, the instructor's own account in a demo workspace, it arrived: this flaky test finder can now run 24/7 by itself, the instructor said, once you add the Jenkins console. In the export, the Slack node is wired, Teams and email are connected but not set up, and the schedule path to Jenkins still has a placeholder URL, as the README's table says.
More than two files? You can have any number of files, or a folder, the instructor said: start with two, then make it generic, take the full folder or the latest folder.
Whatever we are doing, can we do it in Claude Cowork also?
Show the answer
Answer. Claude Cowork is not 24/7, the instructor said, and there are certain issues and limitations, and it takes a lot of tokens; with workflows, you can save your time.
The exports in the repo
The code went to the batch repository in two pushes: at 12:07 IST, during the break, the comment workflow and its Jira-trigger copy, and at 13:08 IST, just after the class, the RCA skeleton, the flaky finder, two chapter images and the README sections. The four exports:
| File | Name inside n8n | Starts from | In the README |
|---|---|---|---|
05_BugTraige_withComments.json |
06_BugTraige_withComments | a chat message | ready |
06_BugTraige_JIRASchedule.json |
06_BugTraige_JIRASchedule | Jira: issue created | ready |
06_RCA_AIAgent.json |
07_RCA_AIAgent | Jira: issue created, with the label | work in progress |
08_FlakyTestCaseAIAgent.json |
08_FlakyTestCaseAIAgent | a form with two files | work in progress |
The links: 05_BugTraige_withComments.json and 06_BugTraige_JIRASchedule.json in Chapter_05_AIAgents_n8n, with 06_RCA_AIAgent.json; and 08_FlakyTestCaseAIAgent.json in its own chapter folder. The two images above are the chapters' own, from their images folders. To use the exports, import each one into n8n, then attach your own credentials, as the README says:
# Chapter 05: n8n -> Workflows -> Import from file, one export per agent:
#   Chapter_05_AIAgents_n8n/01_JIRA_AI_AGENT/01_JIRAAIAgent.json
#   Chapter_05_AIAgents_n8n/02_CreateJIRA_AIAgent/03_CreateJIRATicket_AIAgent.json.json
#   Chapter_05_AIAgents_n8n/03_BugTriage_AIAgent/04_BugTriageAIAgent.json.json
#   Chapter_05_AIAgents_n8n/03_BugTriage_AIAgent/05_BugTraige_withComments.json
#   Chapter_05_AIAgents_n8n/04_BugTriage_Schedule/06_BugTraige_JIRASchedule.json
#   Chapter_05_AIAgents_n8n/06_RCA_AIAgent/06_RCA_AIAgent.json          (skeleton, see 05.5)
# then attach your own Jira + LLM credentials to each workflow
# (05.3 and 05.4 also hard-code the Jira site in the HTTP Request URL; change it to yours)

# Chapter 06: same import, then attach OpenAI + Slack credentials and open the form URL
#   Chapter_06_FlakyTCFinder/08_FlakyTestCaseAIAgent.json
Two more things to change after import. The two triage exports name the instructor's Jira site in the HTTP Request URL, masked on this page: put in your own. And the flaky finder's Slack node sends to one fixed user, so pick your own user or channel, as the README says. None of the four exports holds a key or a token: the nodes carry only a reference to their credential, an ID and a name.
The capstone: one pipeline
Before the break, the instructor listed what remained: the RCA agent, the flaky test detector, and how to use Playwright MCP to run your Playwright tests. n8n will run your test cases by itself, the instructor said, and you do not need Jenkins now: a lightweight mechanism, if you want to replace Jenkins. Running the suite through Playwright MCP needs the concept of MCP first, which the course has not covered yet, so it comes after MCP; I don't want to bombard you, the instructor said. But n8n can take your Playwright tests and run them too, and the instructor will show a working project.
The capstone project, which the instructor has added, wires them all into one pipeline: run a Playwright suite from n8n; send the failures to the triage agent; run the RCA on production bugs; score the flakiness; and a smoke check before the release. You can retry on an error too, and combine them together as one. If you do not know Playwright, no worry: no knowledge of Playwright is needed here, the instructor said. Whenever we run Playwright, we get results, and we take that result, parse it and use it.
Tasks and announcements
- The RCA agent, for everyone. Give it a try. Start from the skeleton in the repo and the README's table above, and practise on free GitHub and Sentry accounts with a dummy repository. If you have problems, let the instructor know. The instructor said they would share the rough RCA diagram so you can try it. In the next class, the instructor will show it done properly with the commits, and, if possible, with a dummy Sentry.
- The capstone project. Give it a try, in the end. Running the Playwright suite, the instructor thinks you will not be able to do as of now, but you can do it later.
- Certification: Introduction to Agent Skills, this week. One more reminder will be sent by email, and the instructor asked Meeti to note it down. The deck gives the date in the last class's section: Friday, 27 November, 10 PM IST.
- A test this Wednesday, 25 November, on generative AI and prompt engineering. It is allocated to you on Wednesday morning, and you have 12 hours to finish it.
- Doubts. The doubt thread for this session is already created: add your doubts there.
- The code: some was pushed before the break, and the instructor started the last push at the end; the repo has both commits.
- Next class: how to run Playwright test cases on n8n, and some of Langflow, side by side, before the course starts RAG. MCP and RAG come side by side, and these two or three things are coming next week.
Task. Give the RCA agent a try, and give the capstone project a try.
Show the answer
Answer. Nothing to copy here. For the RCA agent, start from 06_RCA_AIAgent.json and the README's list of what each node needs: a prompt with the trigger's key, summary and description, a GitHub tool that reads commits, a Sentry tool with its credential, and an update, simplest as a comment. Practise on a dummy repository and a free Sentry account. For the capstone, wire the triage, RCA and flaky steps you have; the Playwright run comes after MCP.